NOTE: Appointment reminders is an additional feature in In Touch EMR. It is not automatically turned on in your account. Please be advised that there is an additional monthly fee once it is turned on. The fee depends on the number of appointment reminder credits that you will avail. You need to contact your account manager to turn this on.
In this lesson, you will learn the following:
- Setting up Appointment Reminders
- SMS Confirmation
- Voice Confirmation
- Phone verification after set up
- Setting each Patient to Receive Appointment Reminders
- Patient List
- Reports
- Usage Detail
Setting up Appointment Reminders
- Click on Marketing.
- Choose Appointment Reminders.
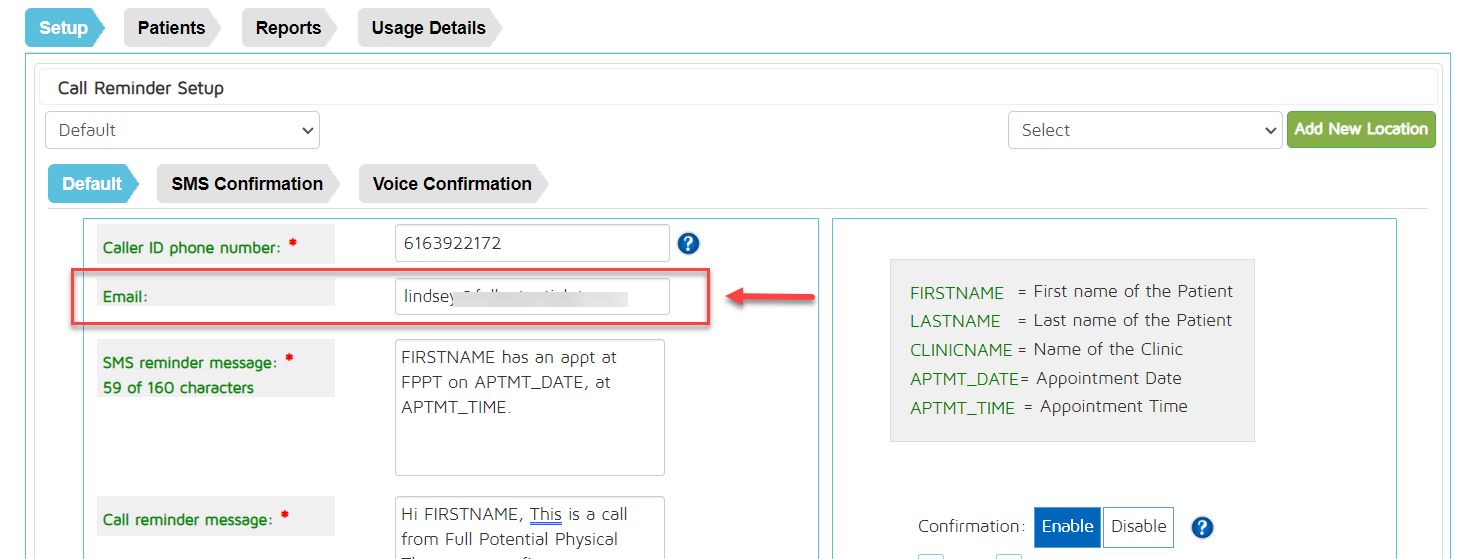
Default - All area with an asterisk is a mandatory field.
Caller ID phone number: * - This is the phone number that appears as the caller ID when patients get automated phone call reminders.
Email - This is the FROM email that appears when your patient receive the email reminders.
SMS reminder message: * (160 characters limit) - We already provided a default Text of what your message contains. But if you wish to edit that, you can edit it here.
Call reminder message: * - We already provided a default message on the call reminder. But if you wish to edit that, you can edit it here.
Email message: * - We already provided a default message on the email reminder. But if you wish to edit that, you can edit it here.
Auto Fill Text - You can choose any of the following information to automatically fill in the associated information for that patient in your reminders.
FIRSTNAME - First name of the Patient
LASTNAME - Last name of the Patient
CLINICNAME - Name of the Clinic
APTMT_DATE - Appointment Date
APTMT_TIME - Appointment Time
Confirmation - if you want to give the patient an option to confirm their appointment.
Set time - This is when the appointment reminder is sent.
2 Hrs Prior
24 Hrs Prior
48 Hrs prior
Restore Defaults - If you want to remove all the edit that you have done and restore the settings provided by In Touch EMR.
Location - You can set different settings for each location.
Receive Responses - Patient replies from the SMS reminders will be sent to the Caller ID when enabled.
SMS Confirmation
Once you have enabled Confirmation, you need to set the confirmation settings. This is what your patients will receive after the initial message that will allow them to confirm their appointment. They will reply to your text message with either of this options to let you know if they are either confirming, cancelling or rescheduling their appointments.
- Primary call to action * (after call reminder message completes): -
- Secondary call to action * (after primary call to action completes): -
- Tertiary call to action * (after secondary call to action completes): -
- Add Stop Message
- Restore Default
Voice Confirmation
Once you have enabled Confirmation, you need to set the confirmation settings. This is what your patients will hear after the initial message that will allow them to confirm their appointment. They will click these options while on the call to let you know if they are either confirming, cancelling or rescheduling their appointments.
- Primary call to action * (after call reminder message completes):
- Primary call to action response: *
- Secondary call to action * (after primary call to action completes):
- Secondary call to action response: *
- Tertiary call to action * (after secondary call to action completes):
- Tertiary call to action response: *
- Voicemail template: *
- Restore Defaults
IMPORTANT STEPS AFTER SETTING UP
- After making the changes to the settings on the appointment reminder, click on Save. This will automatically provide you with a verification code.
- You will receive a phone call and it will ask for this verification code.
- A confirmation message letting you know that the phone number has been verified will appear once you have verified it successfully
Setting each Patient to Receive Appointment Reminders
Each patient have different preferences on how they would like to be contacted. You can set up how appointment reminders are sent for each patient by following these steps:
- On the patient dashboard, click Edit Patient.
- Choose Touch Points.
- Add a Touch Point or
- Click Edit icon on the touch point (Please be advised that there are some phone numbers that is automatically coming over from In Touch Biller Pro).
Once you click on Add Touch Point or Edit icon, this pop-up appears. Choose from any of the options in the drop-down which appointment reminders, the patient should receive.
Once done, click Update on the pop-up page.
IMPORTANT : You will be brought back to the Touch Point page, click UPDATE again to make sure that all changes are saved.
Patient List
To view, search, and edit the list of patients that have opt-in for appointment reminders.
- Go to Marketing.
- Click on the Appointment reminder.
- Patients tab.
- Patient Locator - Type the name of the patient you are looking for.
- Touch Point and Reminder Type - This lets you know what appointment reminder this patient signed up for.
- Settings - This button will automatically direct you to the patient's chart under Touch Points to change the settings on their appointment reminders.
- X icon - to deactivate all reminders.
- Activate All - As long as the patient has a touch point saved (Email, phone number) they will automatically get signed up for all types of appointment reminders.
Reports
The reports tab will provide you the details of the appointment reminder that went out including the call message for the past 24 hours.
Here are the steps to generate the report:
- Go to the Marketing Tab.
- Click on the Appointment Reminders.
- Reports tab.
- Starting Date and Ending Date - Time period of the report you are generating.
- Mode - this has defaulted to BOTH options (Call and text). This will give you the data of appointment reminders for both call and text in a given start and end date. You also have the option to choose CALL if you wish to see all call reports only, and TEXT for SMS reports.
- Patient Locator - You can also type the patient name if you want the report result to be patient specific.
- Confirmation Status - Choose which confirmation status report you wanted to generate from the CONFIRMATION STATUS dropdown menu (Optional). The CONFIRMATION STATUS reports will help you filter reports based on the patients' responses to the appointment reminders they received. Here are the options you can choose from:
- Patient pressed 1 to confirm.
- Patient pressed 2 to cancel.
- Patient pressed 3 to reschedule.
- Search - Once you have selected all your filters, click search to view results.
- Clear - If you want to remove all the filters.
The following are the information available in the reports:
- Numerical sequence.
- Reminder Date and Time - this will give you the date and time as to when the appointment reminder was done.
- Reminder Type - this will give you information as to what type of reminder was generated for the patient. There are 3 types of reminders, email, call/voice message and sms.
- Touch Point and Designated Patient - this will give you information as to which phone number, or email was used to send the appointment reminder.
- Status - this will give you information whether the call reminder's status went through successfully (success) or did not go through (failed).
- Response - this will give you information regarding the patient's confirmation about the appointment reminder they received.
Usage Detail
If a user is subscribed to appointment reminders, a credit will be given. The appointment reminder will only work if there are available credits in your account. If there's none, appointment reminders will not be sent out to your patients. To make sure that all appointment reminders get sent, it is important to track you number of credits.
To view how many appointment reminder credits you have remaining and how much have been used, you can go to the Usage Details.
- Go to Marketing.
- Click on Appointment Reminders.
- Usage Details.
- Starting Date and Ending Date - The time period of the report that you are generating.
- Disable All Appointment Reminders - To stop Appointment reminders completely.
- Daily, Monthly, Yearly - to generate the track report with either of the following information.
- Daily - Daily will give you the details of how much credits were spent per day.
- Monthly - Monthly will give you the details of how much credits were spent in a month period.
- Yearly - Yearly will give you the details of how much credits were spent in a year period.
- Total Units Remaining - number of units you still have available.
- Information once report is generated:
- Date
- Total Units consumed
Low Appointment Reminder Credit
To avoid clinics from running out of appointment reminder credits and not have their appointment reminders go out on time, we have created a notification system to inform clients when their appointment reminder credits are less than 50.
In Touch EMR will show a bell icon on the header to let you know that your appointment reminder credits are less than 50.

In Touch EMR will also send an email alert when the credit is below 20.

This email is automatically generated and sent to the email address that is entered on the appointment reminder set up age.
If you wish to change the email address, go to the appointment reminder set up page and change the email address and click save. Be advised that this is the same email that the patients see as the “FROM” email when they received their appointment reminders.
If you have any questions about appointment reminders call our customer service hotline at 800-421-8442.